Description
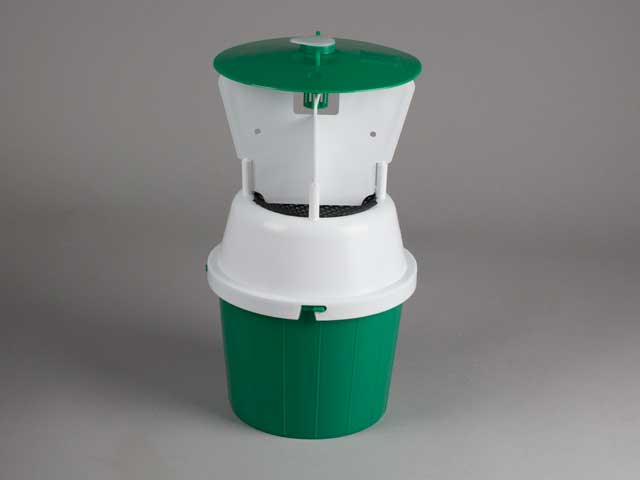
The Chafer Beetles larvae can do extensive damage to your lawn area, feeding on the root structure of the grass. That damage can be worsened even more as birds go after the white grubs, digging up turf as they do so. What to do? Gardening Naturally's Chafer Beetle Trap works in two distinct ways. A powerful pheromone attractant is designed to lure adult beetles into the trap. Additionally, they can be captured as they fly into the vanes on top of the trap, before dropping into the funnel underneath.
The Chafer Beetle Trap is designed for early detection, as opposed to dealing with a large infestation. The idea is that once you see some evidence of chafer beetle activity you will be ready and prepared to employ some other methods of control, such as nematodes. The trap will also reduce the amount of egg-laying adults roaming around.
The trap can be re-used each year by adding a new attractant capsule.
The trap should be placed in lawn areas in May and hung 25 - 50cm above ground level.
One trap will cover up to 2000sq m or half an acre.The attractant will remain active for 6 weeks.
Trap includes 1 x Trap and 1 x pheromone lure.
Refills available on our website.
How it Works: The pheromone trap catches the adult chafer beetle which will reduce the number of chafer grubs in your lawn, it will also give you a good indication of how severe your problem is.
Best time to use trap: Adults are present from May to July (climate dependant) so this is the optimum time to use the trap. We recommend setting the trap up in May.
Trap Positioning: Attach to a wooden stake or bamboo cane just above the ground approximate 25cm - 50cm high, preferably in full sun. One trap per large garden (1/2 acre) is recommended.
Trap Maintenance: Add water to a depth of 3cm with a small dash of washing up liquid into the bucket of the trap. Check the traps on a regular basis, at least twice a week. Top up the liquid in the bucket to the 3cm depth as and when required. One lure should last between 6-8 weeks.
Instructions for use:
1. Add water to a depth of 3cm with a small dash of washing up liquid into the bucket of the trap.
2. Attach the funnel to the bucket by aligning the slots on the funnel with the tabs on the bucket and twisting to lock together.
3. Attach the vanes on the bucket and lock them by pushing down. Be extremely careful when inserting the vanes because they are delicate.
4. Attach the lid to the vanes by aligning the 4 holes in the lid with the 4 pegs projecting from the top of the vanes. Carefully push the pegs into the holes so that the lid is fully attached.
5. Open one sachet which includes one lure and remove the lure(we recommend using gloves). Hold the lure at the bottom of the bubble with the narrow end of the pipette facing upwards so the lure attractant is sat in the bubble at the bottom. Snip off the top of the pipette and place this into the lure chamber so that the spout of the pipette points upwards so no liquid drips out. Refasten the cap.
6. Push the lure cage through the hole in the lid from above so that the cage effectively hangs below the lid.
7. Thread the supplied hanging cord through the two tab-holes on the lid and tie at both ends.
8. Attach to a wooden stake or bamboo cane just above the ground approximate 25cm - 50cm high, preferably in full sun. One trap per large garden (1/2 acre) is recommended.
9. Check the traps on a regular basis, at least twice a week. Top up the liquid in the bucket to the 3cm depth as and when required. One lure should last between 6-8 weeks.